
Overview
Before concrete is poured into slabs, columns, foundations, or retaining walls, one question matters:
Will this concrete flow properly — or create problems?
If the mix is too stiff, it won’t fill corners or surround reinforcement properly.
If it’s too wet, it loses strength and causes segregation.
This is where the slump test becomes important.
The slump test is one of the simplest yet most powerful quality checks used on construction sites. In just a few minutes, it tells whether the concrete is workable enough for placement — without compromising strength.
On busy sites, this small test often prevents:
- Honeycombing
- Weak concrete zones
- Poor compaction
- Structural defects
That is why slump testing is not a lab formality.
It is a site-level quality control tool.
What Is a Slump Test?
The slump test measures how much fresh concrete settles after being placed inside a standard cone and then lifted.
The amount of settlement — measured in millimeters — indicates workability.
Workability means how easily concrete can:
- Flow
- Be placed
- Be compacted
- Fill formwork
It is important to understand:
Slump does not measure strength.
It only measures consistency and workability.
A typical slump for normal reinforced concrete is 50–100 mm, though values vary depending on application.
Why Workability Matters
Concrete strength depends on compaction.
If concrete is too stiff:
- It leaves voids
- Reinforcement is not covered properly
- Honeycombing develops
If concrete is too wet:
- Cement paste separates
- Aggregates settle
- Strength reduces
Good workability ensures:
- Proper compaction
- Uniform density
- Better durability
- Cleaner finish
In practical terms, a good slump leads to good concrete.
Slump Cone Apparatus
The slump test uses standard equipment:
- Cone height: 300 mm
- Top diameter: 100 mm
- Bottom diameter: 200 mm
- Tamping rod: 16 mm diameter, 600 mm length
The test is done on a flat, non-absorbent base plate to ensure accuracy.
These standard dimensions ensure consistency across sites and labs.
Slump Test Procedure (Step-by-Step)
The test is simple but must be done correctly:
First, place the slump cone on a level surface and hold it firmly.
Fill the cone in four equal layers.
Each layer is tamped 25 times using the rod.
After filling the top layer:
- Strike off excess concrete
- Level the surface
Then lift the cone slowly in 5–7 seconds.
The concrete settles.
Measure the difference between:
- Original cone height (300 mm)
- Highest point of concrete after slump
That difference is the slump value.
Record immediately.
Types of Slump
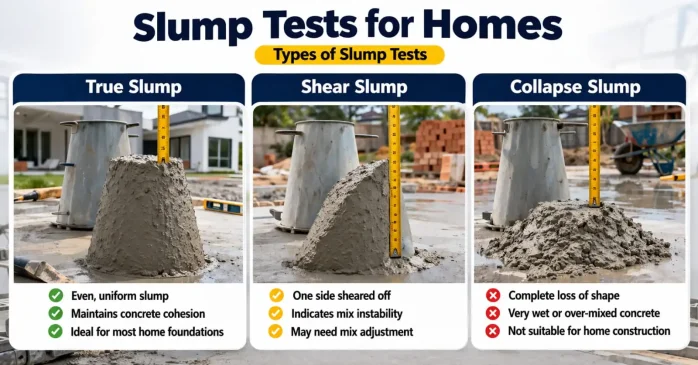
The slump shape tells a lot about mix quality.
True Slump
Concrete settles evenly.
This is the desired result.
Shear Slump
Concrete slides sideways.
This indicates poor cohesion.
Collapse Slump
Concrete spreads flat.
This indicates excessive water.
If shear or collapse occurs, the test should be repeated.
If it happens again, the mix must be checked.
Acceptable Slump Values
Typical recommended ranges:
| Application | Slump Range |
| Mass concrete | 25–50 mm |
| Footings & slabs | 50–100 mm |
| Beams & columns | 75–100 mm |
| Pumped concrete | 100–150 mm |
These values help balance workability and strength.
Hot weather may require a slightly higher slump.
Cold weather allows lower values.
Slump Ranges and Applications
| Slump (mm) / (inches) | Workability | Common Applications |
|---|---|---|
| 0–25 (0–1″) | Very low | Very stiff mix: road pavements, heavily reinforced sections |
| 25–50 (1–2″) | Low | Lightly reinforced footings or slabs; easy to vibrate |
| 50–100 (2–4″) | Medium | General-purpose (e.g. floor slabs, beams) with manual compaction |
| 100–175 (4–7″) | High | Fluid mix: dense reinforcement or pumped concrete |
For instance, ConcreteNetwork notes that 1–2″ slump suits lightly reinforced foundations, while 4–7″ suits heavily reinforced areas. Each project and concrete grade (e.g. M20, M30) may have its own target slump range.
Interpreting Results
- Above Specified Slump: Indicates the mix is too wet. Excess water weakens concrete. As a rule, every extra inch (~25 mm) of slump can reduce strength by ~3.5 MPa. A higher slump also increases shrinkage and risk of cracks.
- Below Specified Slump: The mix is very stiff. It may be difficult to place and achieve full consolidation, especially around rebar. Low slump concrete can have voids if not properly vibrated.
- Within Range: Mix has the right consistency. It should be placed well and cured to design strength.
Most codes allow a tolerance (e.g. ±25 mm). If slump deviates significantly, corrective action is needed: adjust the mix or reject the batch.
Slump Test vs. Compacting Factor
(Alternative consistency test for very low/high slumps)
| Test Type | What It Measures | When to Use | Key Equipment |
|---|---|---|---|
| Slump Test | Workability (slump) | Slumps 10–210 mm | Slump cone, tamping rod |
| Compacting Factor | Compactability (degree) | Very low or high slumps | Compaction mould (0.36 L) |
(Source: Standard testing procedures)
Factors That Affect Slump
Slump is not constant. It changes based on site conditions:
Temperature
Hot weather reduces slump faster.
Aggregate moisture
Wet aggregates increase slump.
Admixtures
Plasticizers increase slump without adding water.
Mixing time
Longer mixing can change consistency.
This is why slump testing is done for each batch.
Limitations of Slump Test
The slump test works best between 25 mm to 150 mm.
Very dry mixes show zero slump.
Very wet mixes collapse completely.
Also important:
Slump does not measure strength.
It only indicates workability.
Other tests and visual inspection are still required.
Site Applications
Slump testing is used in:
- Foundations
- Slabs
- Columns
- Beams
- Retaining walls
Best practice:
- Test every RMC truck
- Test site-mixed batches
- Record time, weather, batch number
This helps track quality across pours.
Slump Test and Construction Quality
Slump testing connects directly with overall construction quality.
In retaining walls, correct slump ensures:
- Concrete surrounds reinforcement
- Weep hole pipes are properly embedded
- No voids remain behind wall
Poor slump leads to:
- Weak zones
- Leakage
- Reduced durability
Similarly, dense concrete provides better base for:
- Concealed wiring
- Plaster finish
- Structural durability
That is why slump testing supports overall building performance.
FAQs
Q1: What is the concrete slump test?
A: A measure of fresh concrete’s consistency or workability. It indicates how much the concrete settles (slumps) from a standard cone shape after the cone is lifted, reflecting water content and mixed fluidity.
Q2: Why is the slump test performed?
A: To verify the concrete mix has the right workability before pouring. Slump testing ensures the delivered concrete matches the mix design’s specifications. This lets contractors adjust the mix if needed (e.g. add water or admixtures) to avoid placement problems and ensure quality.
Q3: How do you conduct a slump test?
A: Place the slump cone on a base, fill it in three layers, tamp each layer with 25 strokes, then lift the cone vertically. Measure how much the top of the concrete has dropped (slumped) from the original cone height. The test should follow standards (BIS IS 7320/1199 or ASTM C143).
Q4: What is a good slump for construction?
A: It depends on the application. As a rule of thumb: ~50–75 mm slump for normal reinforced concrete (e.g. slabs or columns), lower (~25–50 mm) for footings or pavements, and higher (>100 mm) for very flowable mixes. Always follow the project’s specified slump range.
Q5: What happens if the slump is too high?
A: A higher-than-specified slump means the mix is too wet (too much water). This leads to reduced concrete strength, increased shrinkage, and more cracking risk. In general, every extra inch (~25 mm) of slump can cut compressive strength by around 3.5 MPa.
Q6: What if the slump is too low?
A: A lower-than-specified slump indicates a stiff mix. The concrete may be hard to place and compact, especially in heavily reinforced areas. Poor consolidation can lead to voids and honeycombing. If slump is far below target, the mix may need more water or plasticizer, or the batch could be rejected.
Q7: What equipment is needed for the slump test?
A: A slump cone (frustum of a cone, 300 mm tall with 200/100 mm diameters), a baseplate, a 16 mm diameter steel tamping rod, and a ruler or tape measure. These items are prescribed by standards (BIS/ASTM).
Q8: What standards govern the slump test?
A: Internationally, ASTM C143 is the standard test method. In India, BIS IS 7320 (1974) specifies the apparatus and IS 1199:2018 covers the procedure. These documents ensure the cone dimensions and test steps are uniform.
Q9: How often should a slump test be done?
A: Usually at least once for each mix or load of concrete delivered to the site. For critical pours or high-spec projects, testing might be done multiple times per day or per batch to ensure consistency.
Q10: Does the slump test measure concrete strength?
A: Not directly. Slump reflects consistency, not strength. However, it’s indirectly related: wetter mixes (higher slump) often mean lower strength, while very low slump usually means lower water-to-cement ratio (higher strength) but poorer workability. Slump is a quick check; actual strength is verified by compression tests on cubes or cylinders.
Final Thought
Concrete problems rarely start after construction.
They usually start during placement.
A simple slump test takes five minutes.
But it can prevent years of structural issues.
Good concrete is not about luck.
It is about control.
And slump testing is one of the simplest ways to maintain that control.


")


")


